
Easy Blueberry Cheesecake

I have to admit it: I used to find making cheesecakes incredibly stressful. The endless worrying about whether the creamy filling will crack, running back and forth to peek at the cheesecake every 30 seconds or so just to check whether any ugly cracks have appeared, messing about with water baths… listen, I love cheesecakes (seriously adore them) – but all that stress meant that I would make them maybe once every 6 months or so.
BUT (. ) all that changed when I developed my 100% reliable and pretty much stress- (and fuss-) free method for baking crack-free cheesecakes WITHOUT A WATER BATH, while I was writing my upcoming cookbook, Baked to Perfection. (Which you can now pre-order!)
Since then, making cheesecakes (and cheesecake bars) has been a total breeze.
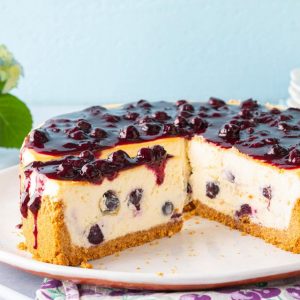
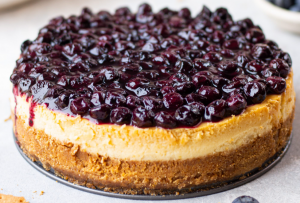
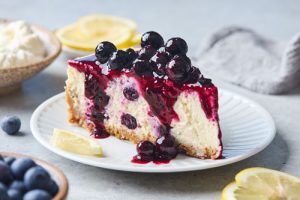
Case in point: this incredibly easy blueberry cheesecake. It’s perfectly creamy, packed full of lemon zest and vanilla, generously dotted with blueberries and topped with a luxurious blueberry sauce. It’s so good, in fact, that I’ve tested this recipe more times than was probably necessary… I simply can’t get enough of it.
So, without further ado: let’s talk blueberry cheesecake.

Before we get to the bits and bobs of making this wonderful cheesecake – if you like what you’re seeing, subscribe to my newsletter to keep up to date on the latest recipes and tips!
Note: the whole recipe, including the ingredient quantities, can be found at the bottom of this page – just scroll down to the bottom, or click the ‘Jump to Recipe’ button at the top of this post.
How do you make blueberry cheesecake from scratch?
Making this blueberry cheesecake from scratch actually couldn’t be easier. You don’t need any special equipment – no stand or hand mixers, no water bath. Just a large bowl, a whisk and a few other kitchen essentials, and that’s it.
First, prepare the cheesecake crust:
- Crush up digestive biscuits or graham crackers (or a gluten-free alternative if it’s a requirement – by the way, I have an AMAZING recipe for gluten-free digestive biscuits in my book, Baked to Perfection!!) until you get fine crumbs. I used a food processor but you could easily put them into a plastic bag and bash them up with a rolling pin.
- Mix them together with melted butter until the mixture resembles wet sand.
- Transfer into a lined 8 inch (20cm) springform pan and, using the flat bottom of a glass or measuring cup, compress them into an even layer with an approximately 1 1/2 inch (4cm) rim around the edge.
- Bake at 350ºF (180ºC) for about 10 minutes, then allow to cool until warm.

Next up, prepare the blueberry cheesecake filling:
- In a large bowl, use a balloon whisk to mix together room temperature cream cheese and yoghurt until smooth. Note that I’ve said MIX and not whisk – don’t aerate the mixture and stop mixing the moment they’re combined and smooth. Introducing air into your cheesecake filling can cause it to crack during baking and cooling, more on that below.
- Mix together caster/superfine sugar, cornstarch and lemon zest, and add them to the cream cheese mixture. Mix well until combined and smooth.
- Add the room temperature eggs, one at a time, mixing well after each addition until combined.
- Add the vanilla bean paste (or vanilla extract) and lemon juice, and mix well.
- The cheesecake batter shouldn’t be too runny – you should be able to see streaks in the filling from mixing, and when you spoon out a dollop and let it drop back into the mixture, it shouldn’t level out and disappear back into the rest of the filling. This texture/consistency means that you haven’t over-mixed your batter (so it’s less likely to crack) and that the blueberries won’t sink during baking.
- Add the blueberries (make sure that they’re completely dry),
- and fold them in until evenly distributed.
- Transfer the blueberry cheesecake filling onto the slightly cooled cheesecake base,
- smooth out the top,
- and bake!


Do you really need a water bath to bake a cheesecake?
NO. I know that using a water bath is highly popular in cheesecake baking, but I’m personally not a fan – for two reasons. First up, it’s fussy and messing about with boiling hot water is not fun. And if you’ve been round these parts before, you know I’m all about no-fuss baking.
Secondly, I don’t like the texture of cheesecakes prepared using a water bath. This is very much a personal preference, but to me it’s much too smooth – almost like eating a mouthful of straight-up cream cheese.
The good news is that I’ve developed an incredibly simple method for reliably preparing crack-free cheesecakes (and cheesecake bars) without using a water bath. Read on to learn all about it!
How do you prevent your cheesecake from cracking without a water bath?
I’ve developed what is now my go-to cheesecake baking method while I was writing my debut cookbook, Baked to Perfection (which is now available to pre-order). Here’s how it works.
To prevent your cheesecake from cracking WITHOUT a water bath:
- Make sure all your ingredients are at room temperature. This is particularly important for the cream cheese, yoghurt, eggs and blueberries (or other add-ins if you’re making another type of cheesecake).
- Don’t aerate or over-mix the batter. That means that you shouldn’t intensively whisk the batter if using a balloon whisk and doing it by hand. I also don’t recommend using a hand mixer. If using a stand mixer, use the paddle attachment and set the mixer to the lowest speed setting – again, you want to mix the cheesecake filling, rather than beat or whisk it.
- Bake your cheesecake at a relatively low temperature of 285ºF (140ºC). This bakes the cheesecake very slowly and prevents the filling from over-baking (which is the most common cause of cracking).
- Turn off the oven while the cheesecake is still wobbly in the middle. For this cheesecake, this is around the 50-60 minute mark. The remaining heat of the oven will fully set the cheesecake without over-baking it.
- Allow the cheesecake to cool until warm or room temperature in the turned-off oven with the oven door ajar. This slow cooling process further ensures that your cheesecake won’t crack during cooling.
And that’s all there is to it. It might be a bit overwhelming looking at this list of ’do’s and ‘don’t’s, but trust me – it’s actually incredibly straightforward. Plus, just check out how lovely and smooth the surface of the baked cheesecake is.

You need to chill the cheesecake in the fridge for at least 4 hours (or preferably overnight) before removing it out of the springform pan onto the serving plate. Then you could serve it directly… but I 100% recommend you add the blueberry sauce on top – it’s crazy delicious, and will take the cheesecake to a whole new level.

How do you make the blueberry sauce?
To make the blueberry sauce:
- Add the blueberries, sugar and lemon juice to a saucepan.
- Cook over medium heat with frequent stirring until the blueberries release their juices and soften slightly – you don’t want them to fall apart or become mushy, just slightly softened.
- Drain the released juices and transfer them back into the saucepan. Transfer the blueberries into a separate bowl.
- Return the juices to the heat and cook until reduced – they should be very viscous and syrupy.
- Once reduced, pour the juices over the blueberries and mix them together.
- Then, pour the blueberry sauce over the chilled cheesecake and gently spread it out into an even layer.


Note that the sauce on top does make cutting the cheesecake slightly messy – so, what you could do is cut the cheesecake without the sauce on top and them spoon it over the individual slices right before serving.
Can you use other berries instead?
Yes!! You could use blackberries or raspberries instead. I don’t recommend trying to use strawberries, as they tend to be too watery (and they might release too much moisture during baking, making your cheesecake filling much too runny).
How long does blueberry cheesecake last?
The cheesecake keeps well in a closed container or wrapped in cling film in the fridge for about 5 days. But, let’s be honest… it really never lasts that long.
And there you have it, friends! An incredibly simple and 100% reliable recipe for an easy blueberry cheesecake that’s bound to impress and that you’ll want to make over and over (and over) again.


If you like what you’re seeing, subscribe to my newsletter to keep up to date on the latest recipes and tips!
Read more: